Transforming Photos into Art with the Sketch Maker Photoshop Action
In the fast-paced world of digital content creation, standing out often means breaking away from the standard polished look. Whether you are a photographer looking to add an artistic edge to your portfolio or a graphic designer needing unique assets for a client project, the Sketch Maker Photoshop Action offers a streamlined solution. This tool is designed specifically for photographers and designers who want to enhance their images, adding beauty and uniqueness without spending hours on manual illustration.
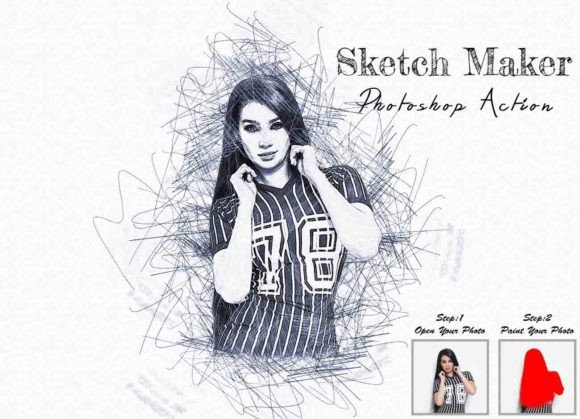
The core appeal of this action lies in its ability to convert standard photographs into stunning, sketch-like visuals that feel both organic and professional. It does not just apply a simple filter; it processes the image through a series of automated steps to create a result that looks hand-drawn. With ten distinct color options available, users can experiment with different moods and styles, ensuring that every output feels fresh and tailored to the specific project at hand.
Why Designers and Photographers Choose Automated Sketch Effects
Creating a realistic pencil or charcoal sketch from a photo manually is a time-consuming process. It requires a deep understanding of layer blending modes, brush dynamics, and lighting adjustments. For professionals working under tight deadlines, this luxury of time is rarely available. The Sketch Maker Photoshop Action bridges this gap by automating the technical heavy lifting while still allowing for creative control.
One of the most significant benefits is consistency. When you are working on a series of images for a brand campaign or a wedding album, maintaining a uniform style is crucial. By using a tested and reliable action, you ensure that every image processed shares the same aesthetic DNA. This is particularly valuable for small business owners and marketers who need to produce high-quality visual content regularly but may not have the budget for custom illustrations.
Real-World Applications Across Industries
The versatility of this tool means it fits seamlessly into various professional and personal workflows. Here is how different users can leverage the Sketch Maker Photoshop Action in their daily tasks:
- Digital Marketing and Social Media: In a feed saturated with high-resolution photos, a sketch-style image stops the scroll. Marketers can use these effects to highlight product features in a way that feels artistic rather than commercial. For example, a fashion blogger might convert a street-style outfit photo into a sketch to emphasize the texture and cut of the clothing, creating a more editorial look.
- Wedding and Portrait Photography: Photographers can offer premium packages that include "artistic prints." By converting a couple’s portrait into a soft, romantic sketch, you provide a tangible product that differs from standard prints. The ten color options allow you to match the sketch tone to the wedding theme or the interior decor where the print will hang.
- Educational Materials and E-Learning: Educators and course creators often need visuals that are engaging but not distracting. Sketch-style images can simplify complex scenes, focusing the viewer’s attention on the subject matter. A history teacher might use sketched versions of historical figures to create worksheets that feel less like stock photos and more like textbook illustrations.
- Interior Design and Architecture: Architects and interior designers can use this action to present concepts. Converting a 3D render or a site photo into a sketch can make a proposal feel more approachable and conceptual, inviting clients to imagine the potential rather than judging the current state.
Technical Compatibility and Setup Requirements
Before diving into creative applications, it is essential to understand the technical framework. The Sketch Maker Photoshop Action has been rigorously tested to ensure stability and quality. It is fully compatible with the English versions of Photoshop CS6, CC2014, CC2015, CC2015.5, CC2016, CC2017, CC2018, CC2019, CC2020, CC2021, and CC2022. This broad compatibility ensures that users with older hardware or software licenses can still benefit from the tool.
However, achieving the best results requires following specific preparation steps. The action is sensitive to image dimensions and layer structure. To get the high-quality result promised, you must prepare your file correctly before hitting play. Here is the practical workflow you should follow:
- Resize Your Image: Consistency starts with dimensions. Select the Crop Tool and look at the top menu bar where you see fields for Width (W), Height (H), and Resolution (Reso). Enter 3000px for Width, 2000px for Height, and set the Resolution to 72. Press enter to apply. This standardization helps the action calculate brush strokes and effects accurately.
- Prepare the Paint Layer: Open your photo and create a new layer. It is critical that you rename this layer “paint” in lowercase letters. The action scripts are likely programmed to look for this specific name to identify where to apply effects.
- Apply Base Colors: Select a brush and paint over the areas of the image you want to influence. This step allows you to guide the sketch effect, highlighting key features. Once done, close the eye icon on the paint layer to hide it, but keep the layer selected.
- Execute the Action: Click the play button on the action panel. The software will process the image, utilizing the hidden paint layer as a map for the sketch generation.
Customization and Control
While the action automates the process, it is not a black box. The inclusion of ten color options means you are not stuck with a single monochrome look. You can choose warm sepia tones for a vintage feel, cool blues for a modern aesthetic, or stark blacks and whites for high contrast. This flexibility is vital for matching the output to your brand guidelines or personal style.
Furthermore, the package includes masking options and organized layers. This means that after the action runs, you are not left with a flattened, uneditable image. You can tweak individual elements, adjust opacity, or refine edges using the provided masks. For users who want to learn the intricacies of the process, the included video tutorial link and PDF help file serve as excellent resources. These guides demystify the process, helping you understand not just how to use the tool, but why it works.
Making the Right Choice for Your Workflow
When considering whether to integrate the Sketch Maker Photoshop Action into your toolkit, think about your volume of work and your need for uniqueness. If you frequently need to create artistic variations of photos, this tool pays for itself in time saved. It allows you to experiment with styles that might otherwise be too risky or time-intensive to attempt manually.
Remember that the quality of the output is directly related to the quality of the input. High-resolution, well-lit photos will yield the most detailed and impressive sketches. Also, take advantage of the included brushes file to customize your initial paint layer, giving you even more control over the final look. By combining the efficiency of automation with your own creative direction, you can produce awesome, unique looks that elevate your visual storytelling.